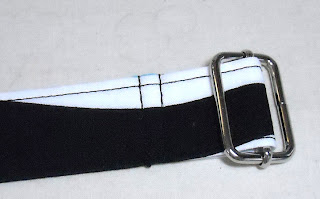
The Sheila Purse & Joey Purse have a long strap which I use cross-body or as a shoulder strap. But you can use these instructions to make a longer strap that can adjust! In my patterns, it works for these 2 purses or for the Travel Purse or even the Jamie Purse!
For this Adjustable Strap, you will need:
- one long strap (made per pattern instructions - for the Sheila or Joey this is about 40" long)
- one short strap (make a second strap like the pattern except make it 12" - 20" long)
- one Slide Buckle to fit (for the Sheila or Joey - 1.25")*
- one Rectangular Loop to fit (for the Sheila or Joey - 1.25")*
*You can buy a Slide Buckle & Rectangular Loop set on my website!
1) Make a long strap and a short strap. I like a 40" (width of fabric) long strap and a 12" - 20" short strap.If you're following the Joey Purse or Sheila Purse pattern, cut an additional strap piece 12" - 20" long and make just like the long strap. When interfacing, make sure there is about 1/2" non-interfaced fabric on one end of the strap.
2) Start with the Short Strap - Press the 1/2" non-interfaced end up towards the wrong side. Trim to 1/4".
3) Slide the pressed end through the Rectangular Loop (wrong side is up). Fold pressed end down, wrong sides together, about 1". If there is a weld on the Loop, make sure it will be covered by the fabric. Pin.
4) Stitch closed to folded edge. Reinforce by restitching same line. Then stitch about 1/4" away, towards Loop, restitching to reinforce.
Short Strap is Finished!!
5) Make the Long Strap - Press the 1/2" non-interfaced end up towards the wrong side. Trim to 1/4".
6) Insert the pressed end of Long Strap on the left side of the center part of the Slide Buckle from the top. Bring pressed end up around center part (from the bottom) to the right side of the Buckle. Wrong side of strap is up.
7) Fold pressed end down, wrong sides together, about 1". Pin.
8) Stitch closed to folded edge. Reinforce by restitching same line. Then stitch about 1/4" away, towards Buckle, restitching to reinforce.
Long Strap is Finished!
9) Connect Long and Short Straps - Place Short Strap right side up with loop towards raw (non-buckle) end of Long Strap. Long Strap should be wrong side up.
10) Insert raw (non-buckle) end of Long Strap through Loop from the bottom. Place Long Strap wrong sides together.
11) Insert raw (non-buckle) end of Long Strap through Buckle from the bottom, on the left side of the Buckle.
12) Insert raw (non-buckle) end of Long Strap through Buckle from the top on the right side. In other words, you've just "looped the buckle" in steps 11-12. Pull on the end of the Long Strap to make strap longer or shorter.
Adjustable Strap is Finished!!
Both ends of the strap are raw, ready to attach as your pattern instructs. Who knew it was that easy to make an adjustable strap!?
Any questions?


The strap patterns that you made are beautiful. I think they would fit with lunch bags or body bags. However, I’m curious if the measurement you used was the standard length for a bag strap. It's usually around fifty inches or less right? Anyway, it depends on the size of the bag you’re making and your preference of course.
ReplyDeleteThelma Bowman
I like mine longer and adjust for that. These patterns and this tutorial are great.
ReplyDeleteI find the total of the two straps (one long, one short to equal 52" - 60") to work fine for me. But the beauty of sewing is you can make it any length you want! Plus it's adjustable to make it the exact length you want - the resulting strap can be worn cross-body or on the shoulder (I ofton switch off on the purses I carry).
ReplyDeleteThanks, Linda, glad you liked it!!
ReplyDelete