
Two different fabrics make them reversible - if you get a small spot at lunch, flip them over for dinner! I like to use cotton batting instead of polyester fleece or batting because you can then use them for hot plates (polyester may melt from the heat),
They are easy to make! Here is the free pdf paper pattern
Keep in mind that 1/2 yard each of two fabrics makes 3 placemats.
Materials (makes six):
- 1 yard main fabric
- 1 yard contrast fabric
- Cotton or cotton/poly thin (quilt) batting - 1/2 yard 90" wide or scraps
- free pdf paper pattern
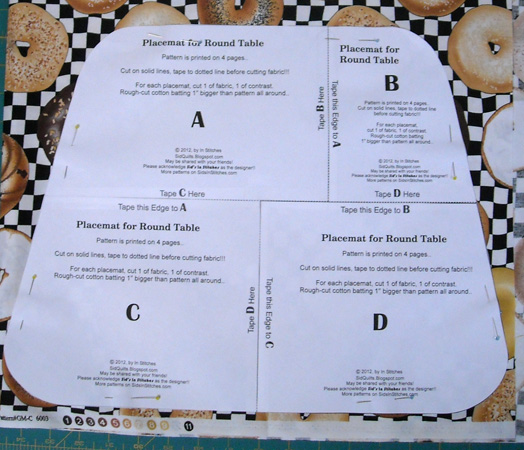
It will print on 4 pages. First download it (right click on link, then "save as" to your desktop), then open (double-click on it) and print from Adobe with Page Scaling set to NONE (NOT "Fit to Printer Margins").


Cut out pattern pieces on the solid lines. Tape B to A, aligning the solid line of B with the dashed line of A. Then tape C to A, aligning the solid line of C with the dashed line of A and matching the left side of the pattern.

Finally, tape D to C and B aligning the solid lines of D to the dashed lines of C and B.
2) Cut the Main Fabric:
Using this layout, you will cut 6 placemats out of each yard of fabric.

Here's my method: Keep fabric folded the way it comes off the bolt (IMPORTANT! Make sure fabric is straight by aligning selvage edges as seen in photo below). Fold in half crosswise, bringing cut edges together. Cut off selvages (you never want the selvage in your finished product). Align pattern piece close to selvage edge, centering as illustrated below. Pin and cut through four layers.


Don't you hate it when the fabric is not cut straight! Look at the difference when I aligned the selvage edges! I use a rotary cutter instead of scissors because it gives me a smoother line.


After cutting the placemat through four layers, unfold the remaining fabric completely, then fold it crosswise to fit the pattern.

Cut through two layers to make 2 more placemats.
3) Cut the Contrast Fabric & Batting:
Folding the fabric as in Step 2, cut rectangles larger than the pattern.

DO NOT CUT the pattern out of the Contrast Fabric or Batting, just make it a rectangle!!

Cut the Batting a bit larger than the Contrast Fabric

I like to use scraps from quilts I have made. In fact, you can piece batting scraps by butting the edges together and joining with a continuous zig-zag stitch.
4) Pin & Sew:
Lay the Contrast Fabric centered on the Batting with Contrast Fabric right side up. Place the Main Fabric, centered, right sides together with Contrast Fabric.

Pin all the way around.

You will be leaving an opening at the bottom of the placement large enough for your hand (5-6").

Sew with 1/4" seam (from edge of Main Fabric piece, of course), double-stitching at beginning of opening on bottom of fabric and at end before the opening.
5) Trim!
This is the step that will give your placemats the professionally-looking, crisp edge.


Trim the batting close to the stitching. I like to use a pair of duckbill applique scissors because they are really sharp, but let me get close without cutting through the stitching.

Make sure and trim the batting at the opening evenly!

Trim Contrast Fabric approximately 1/4" larger than Batting.

Clip curves about 1/2" apart (5-6 clips per curve). Be careful not to cut through the stitching!
6) Turn & Press:


Reach into the opening and turn placemat right side out.

Inside the placemat, run you fingers along the curved seam to push them out smoothly.

Tuck seam allowances evenly in at opening.

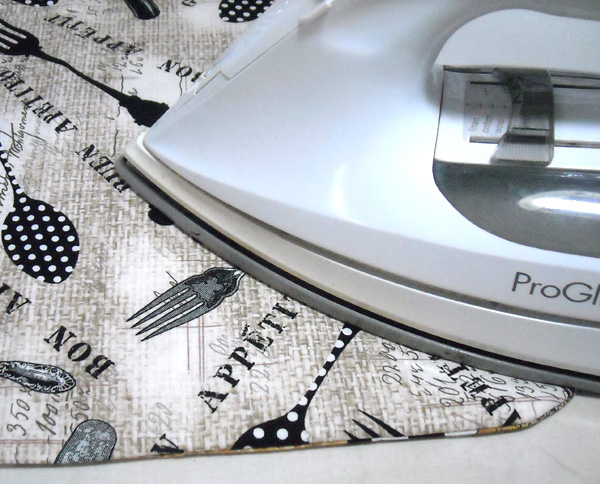
Press both sides well, taking care to keep opening edges neat and straight.

Pin opening edges together.
7) Edge Stitch & Quilt:


Edge stitch approximately 1/8" from edge. I like to use my Edgestitching Foot! You will be stitching the opening closed, so stitch carefully in this area.
Mark for Quilting:
Don't be alarmed, non-quilters! You'll just be stitching some lines!!


Fold Placemat in half crosswise, pinning at center marks. Unfold and "eyeball" this line vertically.


OR use masking tape: fold placemat in half crosswise, right side out and line up masking tape with fold. Unfold and use the tape as your guide.


Stitch a vertical line down center of Placemat, either "eyeballing" with your pins or following left edge of masking tape. Use a longer stitch length (a 3 on my machine, the standard length is 2.5). Make sure and backstitch at the beginning and end of the seam - I like to start and finish at the edgestitching to make it look neat.

Stitch another quilting line 3.5" away from the center line. You could also use masking tape to mark this line, but at this point I just "eyeball" it!

Stitch a third quilting line 3.5" away on the other side of the center line.

You're finished!
Now make as many more as you like. I make them all at once, assembly-line fashion.

Here's the reverse side. My daughter is threatening to take these with her to college (bagels and cooking are her favorite things).
Enjoy your Placemats!
Post a picture on my Facebook page!
How many will you make?
Great pattern - can't wait to try it. Thanks so much for sharing, Syd.
ReplyDeleteWonderful pattern! Even if someone doesn't have a round table it's nice to have something a bit different.
ReplyDeleteThanks! I'm making another set for holidays - Christmas on one side, maybe 4th of July or Autumn on the other!!
ReplyDeleteThis comment has been removed by the author.
ReplyDeleteThese will be perfect for our Ladies Luncheon at church! Thanks so much for sharing with us.
ReplyDeleteI'm lazily using oilcloth and bias tape for my set, but I'm delighted to find a pattern for the wedge shape! It's perfectly midcentury vintage looking with the retro print oilcloth. Thanks!
ReplyDeleteI would dearly love this pattern but am unable to download it. When i lick on the pattern link I get the message page unknown.
ReplyDeleteOops! Sorry about that - updating the webpage and I missed this one. Try again above or use this link: http://www.sidsinstitches.com/free-placemat-pattern.html
DeleteTHANKS SO MUCH for letting me know!!
Got it this time. Thanks so much for updating. Can't wait to try this pattern.
DeleteI cannot get the pattern to go to my printer, ?????
DeleteUnknown is Marilyn Snead
DeleteYou should be able to download the pdf file for the pattern to your computer, open it with adobe software (free on adobe.com) and then print from there.
DeleteClick on "free pdf paper pattern" after the above link, it will download to your computer.
DeleteCan you happen to tell me the dimension of the placemat once it's complete. Standard mats seems to be around 19" x 13". Was looking for larger ones, so not sure it this pattern would meet my needs. Thank you.
ReplyDeleteThe placemats are 15" wide at the widest point and 12" deep. Perfect to fit 6 at a 54" round table - they fit standard plates, silverware, and glasses too. Of course, you can make your pattern larger easily.
ReplyDeleteThank you so much for pattern and tutorial!
ReplyDeleteWhat size square of fabric should I use for a table that is 33 1/2" diameter?? Love the tutorial and free patterns.
ReplyDelete