
It's easy to make and only takes a little fabric!

You can even use patchwork scraps or a contrasting fabric for the Back!!
If you'd like a printable PDF of this pattern, please see my Etsy Page.
Materials:
- fat quarter (18" x 22")
- or 1/8 yard fabric
- or 2 fat eighths (9" x 22" each)
- or scraps (see cutting below)
- 2.5" x 4" piece of clear vinyl
- 1/8 yard of heavyweight fusible interfacing (I like Decor Bond but any interfacing will do!)*

Cutting:
- 3.5" x 5.5" -cut 4 from fabric (2 for front, 2 for back)
- 2" x 12" -cut 1 from fabric (strap)
- 3" x 5" -cut 4 from interfacing
- 2.5" x 4" -cut 1 from clear vinyl

*A Note About Interfacing:
I like to use heavyweight interfacing (Pellon Decor Bond) because it makes a durable tag. Remember you will be stitching through several layers of fabric and interfacing (6 layers at the end). I recommend using a Jeans/Denim (Sharp) needle and stitch slowly! If your sewing machine can't take it, just use a lighter weight interfacing and it should be fine. If you're using a heavier, upholstery-weight fabric, a lighter interfacing will work.


1) Iron interfacing onto each fabric piece (except strap), centering so there is approximately a 1/4" border all around. I like to press from the right side of the fabric - that way I don't need a pressing cloth and I can use a hot iron for good adhesion. If your fabric wrinkles, your iron is too hot. Turn it down, let it cool, and press again to flatten.

Make Front
2) Place 2 fabric pieces right sides together and pin. Sew all the way around using a 1/4" seam.

3) Cut corners diagonally.

4) Mark Window: Make a pencil line 1" from one long edge.

Make a pencil line 1" from one end and 1" from other long edge.

Make a pencil line 1.25" from the other end. This is where the buttonhole will be!

Join corners of the box you made to make an "X" in the center of the tag front.


5) Make Window Opening: Cut on marked line through BOTH layers!


Fold back (4) triangle-shaped pieces on one side, press well.


Turn front over and repeat. Trim points off to leave about 1/4 - 3/8" seam allowance.


Turn right side out, pushing corners out well with a point-turner or chopstick.


Press well, making sure window opening seam allowances stay turned to inside. Place warm tag front under an acrylic ruler while it cools.


6) Finish Window: Slide vinyl into the Luggage Tag Front. Your vinyl will be sandwiched between the fabric pieces. If you can't find clear vinyl, you can leave this step out, but the card might get wet!
Notice that when I cut the vinyl, I leave the paper on until I get to this step. Because I have lost more pieces of vinyl - they're clear and hard to see if misplaced!!

Slide vinyl away from the wider end. The vinyl piece you cut should have only a little leeway to move.

Stitch around the window opening about 1/8" from edge, making sure to catch the folded edge on both sides. Use a slightly longer (approximately 8 stitches per inch) stitch length. Backtack (stitch back and forth) well at end, where you meet your previous stitching.

7) Make buttonhole: Mark a 1" buttonhole centered on end that is wider. The buttonhole ends will be about 1" from edges.

A Note About Buttonholes - If you have trouble with your buttonholes looking "ragged", just stitch it TWICE, stitching same length buttonhole the second time on top of the first one. It will appear much neater. Stitch slowly, as you are stitching 2 layers of fabric and 2 layers of interfacing. My Bernina has a special Buttonhole Foot that stitches the same size over and over - helpful when I'm making lots of Luggage Tags!

I like to use a Buttonhole Cutter to make the opening in the buttonhole. If you use a seam ripper, be careful of the ends!! And remember, Fray Check is your friend, if you need to "correct" a few threads that may have gotten cut!
Make Back
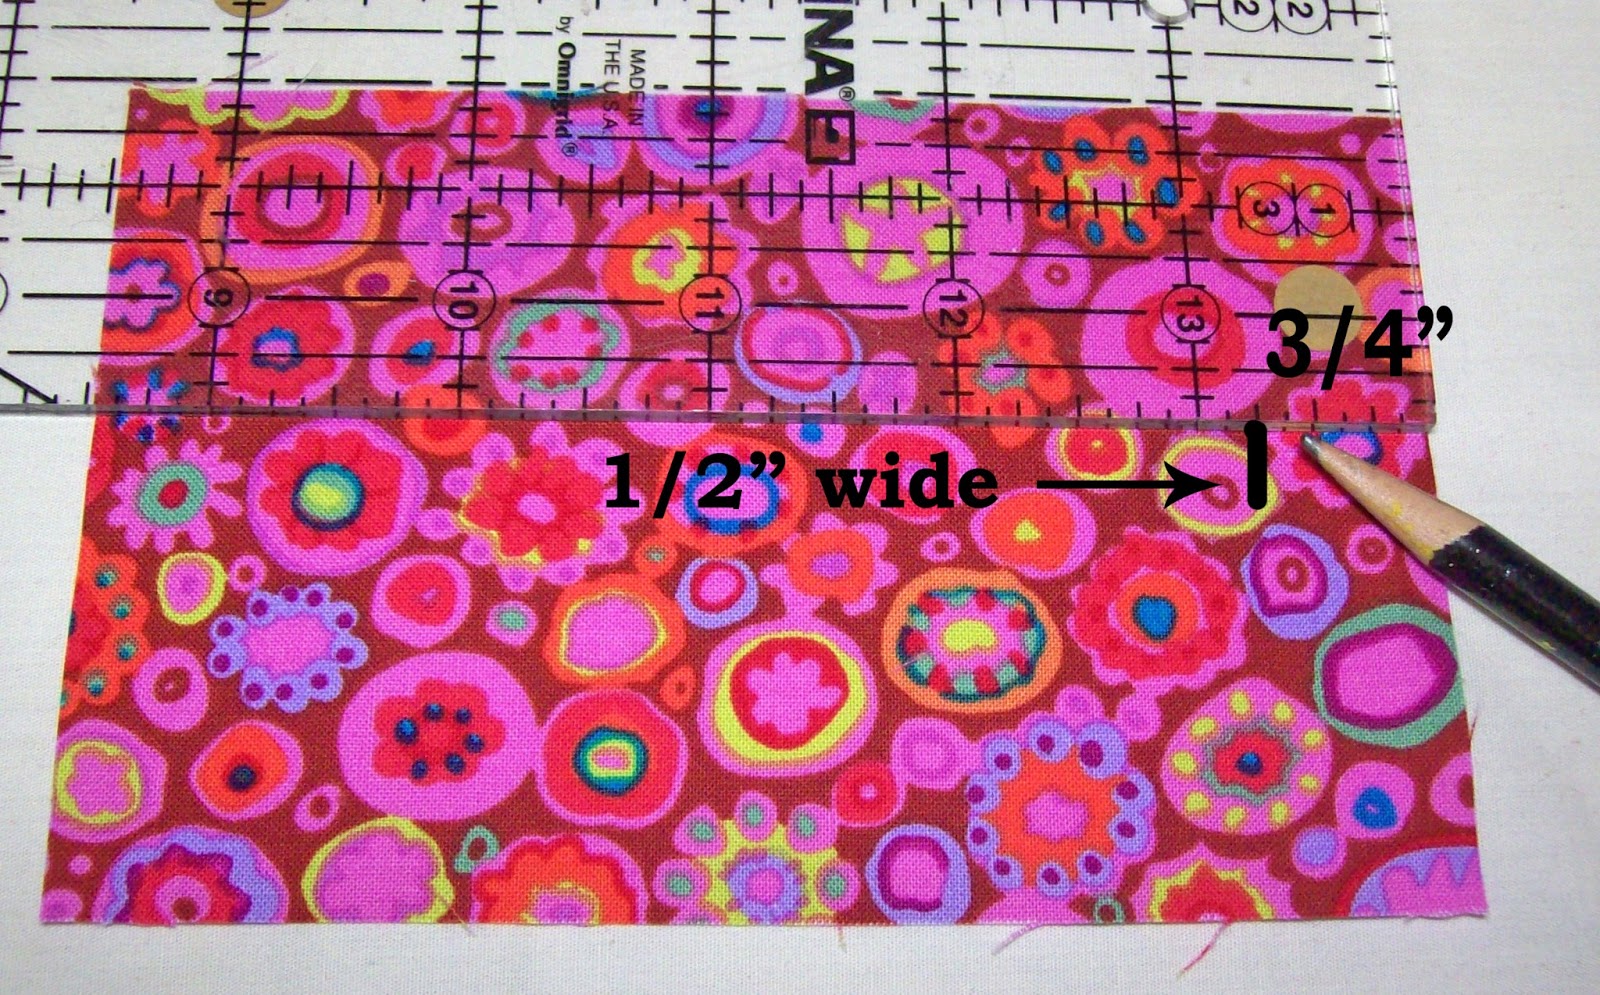
8) Mark Strap slit in one Back fabric piece by making a 1/2" wide line 3/4" from one end about 1.5" from each side.

Again, I like to cut the slit using my Buttonhole Cutter (it happens to be the exact width needed)! You HAVE to cut the slit BEFORE sewing the back!

9) Pin Back piece with slit to remaining fabric piece, right sides together. You will be leaving about a 3" opening on one long side when you stitch.

10) Stitch with 1/4" seam, leaving 3" opening, backtacking well at beginning and end of seam.


Clip corners and turn right side out through opening.


Tuck in seam allowances at opening to make a straight edge. Press well.


Make Strap
11) Press Strap: Fold strap in half lengthwise and press well.


Fold one side in to meet crease. Press well.


Fold other long edge in to meet crease. Press well.

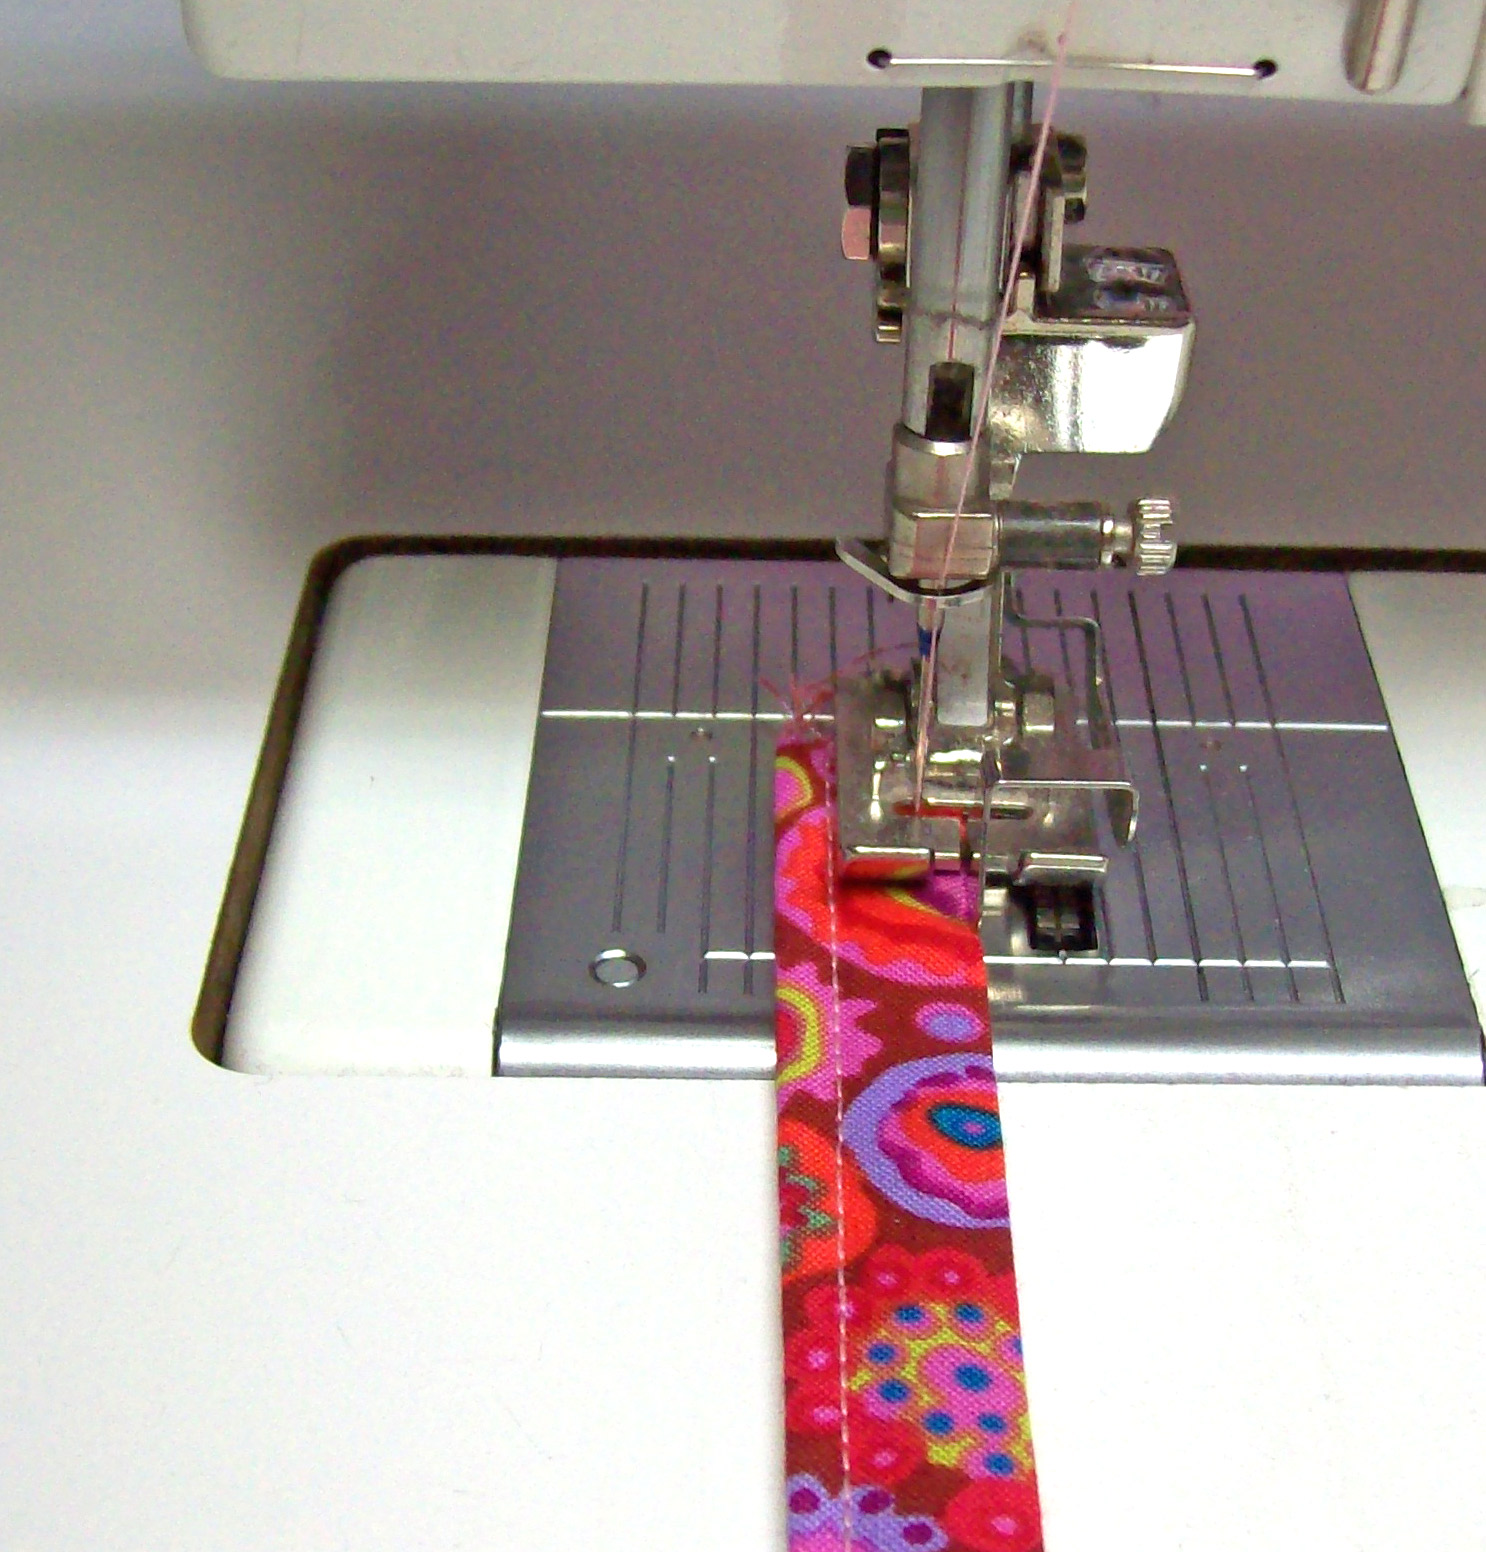
12) Sew Strap: Stitch 1/8" from edge on each long side of Strap. Press strap and fold in half so raw edges meet to make a loop.

13) Attach Strap: Slide Strap loop raw edges into slit on back. I like to use my small scissors to tuck it in. You may need to make the slit a little larger to fit your strap!

Make sure strap extends approximately 1/2" under the slit. Pin. You can't see it in this picture, but your strap is now a loop! The ends of the strap will be sandwiched inside the fabric of the Back.


Stitch on the strap area under the slit in a box shape through all layers for strength. Backtack well where your stitching meets!

Finish Luggage Tag
14) Place Front (with window) on top of back (with strap side up), inserting strap into buttonhole.

Align edges.


15) Pin, making sure the seam allowances at opening on back are tucked in and pinned well. This opening will be stitched closed in the next step.You will leave the end with the strap OPEN when stitching!

16) Stitch around three sides about 1/8" - 1/4" from edge, leaving end with strap open. Backtack well at beginning and end of seam! Make sure you are catching the front and back edges and the opening of the back (that you turned through) is stitched closed.

FINISHED!!
To Add Your Information

Slide Strap out of buttonhole to leave an opening in the end of the Luggage Tag.


Slide in a business card or business-card size piece of cardstock.
Slip Strap through buttonhole to secure.
A business card is 2" x 3.5". I like to put a large name on the side that will show through the window. Your address and cellphone number can be on the other side. If your luggage is lost, they will open the tag to find the information but bad guys scoping the airports won't be able to see your home address!!
To Attach to Your Suitcase:


Place loop across your luggage handle. Slide Tag through loop of strap. Pull tight!
These make GREAT gifts!

How many will you make?
Who will you give them to?
What is the occasion (wedding, Mother's Day, Father's Day, birthday, Bon Voyage)?
Make the perfect purse companion for traveling! Check out my Etsy Shop.
 |
| Adventure Bag |
 |
| Journey Purse |
This is a perfect tutorial! Thank you. I have one done and know I will make more.
ReplyDeleteThank you so much for this tutorial. I had been wondering how to get the fabric to look nicely sewn over the vinyl (instead of the vinyl over the fabric). Step 5 must be the best lesson i have learnt in all my sewing experiences :).
ReplyDeleteVery good tutorial. I have one from Craftsy, and I couldn't figure out which pieces she was talking about. You have done an excellent job. I have been sewing a long time, and I gave up on that one. I am anxious to try yours. Thanks for sharing. One of the things I have picked up from Craftsy is to use a clapper for pressing. What a difference it makes. I had my son make me one since I couldn't find one locally. Love you idea about what to write on the front of the ID tag.
ReplyDeleteI linked your wonderful tutorial on my blog related to sewing fabric postcards! Thanks ShereeSews
ReplyDeletehttp://sewfabsew.blogspot.com/2015/04/fabric-tags.html
Great idea and tutorial! I made a bunch for gifts. Thanks!
ReplyDeleteThanks for a great tutorial! Made one yesterday and will make several more.
ReplyDeleteI am definitely enjoying your website. You definitely have some great insight and great stories. Best Luggage Straps in 2018
ReplyDeleteJust a quick note to tell the general public about a great man who brought my husband back to me after 11 years, his name is Dr. OKO. My husband was snatched from me by another woman when I went to see my sick mother, I came home to meet the house empty my husband was not at home, he wan’t picking call none will he call back. I was left alone with our 4 years old baby, he was gone for 11 years but just a month ago a friend of mine called me to tell about oko and she gave me his contact and I did contacted him and he told me my husband was with another woman. Also, he said he will bring back my husband within a few days, I thought it was a joke but behold my husband came home begging for forgiveness just as OKO promised. Off course I forgave my husband everything became normal even more that it was before. You too can be helped by him if interested through: okotemple@live.com or call/whatsapp: +2348131684022.
ReplyDeleteI'm making a couple as gifts. I've been studying tutorials for a couple of months and of all that I looked at this was definitely one of the easiest to follow, even though it's not in video! Plus I loved how the edges looked in this one!
ReplyDeleteSome of the other tips have definitely been priceless too. I was planning on making an info card out of cardstock and your tips are pretty invaluable for this. I think the final project will be one I'm proud to give as gifts and I think my friends will genuinely like them.
Thank you so much for the tutorial and the tips along the way!! I look forward to making a few extra for myself and my husband!!
:)
This comment has been removed by the author.
ReplyDeleteWhen travelling long distances by air, sea, or railway, personalized luggage tags in UK is the only best option for you. When you arrive at your location, the first thing you should do is retrieve your luggage. It is vital if you want to make the most of your vacation or business trip. Luggage tags are the only way to ensure that your luggage collects without hassle
ReplyDeleteI just found this tutorial on Pinterest. I needed to make a larger document holder for auto registration and insurance for my son. This was so helpful and it turned out wonderful! I increased everything to fit. Thanks for a great tutorial.
ReplyDeleteBest Of All. We Design any size and any shape of custom tags for bags, if you need for travel bags for any use. We are Custom Design Company. call now 0203 769 5141
ReplyDeletethanks for sharing great post ...
ReplyDeletelocal paper bags Manchester
brown kraft paper bags
wholesale paper bags
luxury paper bags London
gift bags with ribbons
Any writer that takes the time to research a subject as thoroughly as you have deserves to be commended. This article is appealing and very well-written. The first two sentences encouraged me to read more. The #1 custom Paper Luggage Tags
ReplyDelete. Affordable for luggage. Any size and any Custom Designs we can deliver. Call us Now 02037695141
Grab 50% OFF on personalised luggage tags with your own photos online. Talk to our Production Manager Luggage Tags Printing. The reason of their high demand lies in the fact that they are light in weight as well as stylish in nature.
ReplyDeleteIf you need Round Swing Tags in UK we have multiple shapes and materials qualities. we can give you best price in town Guaranteed. Call us now.
ReplyDeleteRead More: The Complete Guide to Kraft Swing Tags in the UK (2025 Edition)
Guide to Water Bottle Hang Tags: Custom Wine Bottle Hang Tags in the UK and London
Guide to Hang Tags with String: Trusted Suppliers
Sky Tags And Bags offers high-quality Paper Counter Bags, perfect for retail and takeaway businesses. Eco-friendly, durable, and customizable, these bags ensure a professional presentation while promoting sustainability — ideal for showcasing your brand with style and responsibility. Plain White or Brown Call for More Details. 07360238910.
ReplyDeleteContact Us
For more information on sourcing local paper bags in Manchester and the UK, or to get custom solutions tailored to your business, feel free to contact us.
📧 Email: sales@tagsandbags.co.uk
📞 Phone: 07360238910
🌐 Website: www.tagsandbags.co.uk
Sky Tags And Bags offers high-quality Paper Counter Bags, perfect for retail and takeaway businesses. Eco-friendly, durable, and customizable, these bags ensure a professional presentation while promoting sustainability — ideal for showcasing your brand with style and responsibility. Plain White or Brown Call for More Details. 07360238910.
ReplyDeleteRead More: Everything You Need to Know About Round Swing Tags in the UK
Elevate Your Brand with Luxury Paper Bags in London & BeyondIn today’s competitive retail environment, luxury paper bags is no longer just about carrying products — it’s about delivering a brand experience.
ReplyDeleteThis comment has been removed by the author.
ReplyDeleteThe #1 Custom Swing Tag supplier online. Affordable clothing & apparel tags made of premium or recycled materials. Fast turn around & delivery. Call us Now.
ReplyDeleteRead More:
Everything You Need to Know About Round Swing Tags in the UK
The Complete Guide to Kraft Swing Tags in the UK (2025 Edition)
Guide to Water Bottle Hang Tags: Custom Wine Bottle Hang Tags in the UK and London
Are you looking for Customised Paper bags in UK, Due to our custom bags’ efficiency and effectiveness. Client always come back to us. Call us Now 07360238910
ReplyDeleteShop kraft bakery boxes with window—eco-friendly, sturdy, and ideal for cakes, cookies & more. Discover brown kraft bakery boxes for stylish presentation. Read More:
ReplyDeleteBest Platforms for Selling Stickers Online
Scaling Your Custom Sticker Side Hustle: From Startup to Standout