I have a confession to make: I am not the best housekeeper. There just seems to be a lot more interesting things to do than scrub the floor. But I do keep my sewing machine clean!
If your sewing machine is skipping stitches or breaking needles, it may need a cleaning. Cleaning your machine regularly will also keep your sewing machine out of the shop!
 |
| When there's visible lint anywhere, it's time to clean it! |
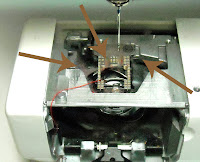
Here's just some of the visible lint - this machine is VERY dirty!!
There are some general cleaning tips that can be used for any sewing machine. The first is to keep lint cleaned out of the bobbin area. Tip your machine back to get a better view.
Open the door to your bobbin, remove the bobbin and bobbin case (in some machines you can’t really remove the bobbin case).
What kind of brush should you use?
I recommend you throw away the small brush that may have come with your sewing machine! The handiest brush to use is a clean 1/2" paintbrush (you can see how worn down mine has become from use). There are also lambswool brushes, which are very good for cleaning the outside and tension disc areas.
Brush out the top area first. Make sure and get in the tracks of the feed dogs and all crevices. Try to brush up and out, but it's ok if some lint falls down into the bobbin race area below. If your sewing machine bobbin loads from the top, make sure and use a flicking motion to brush the lint up and out!
Brush the bobbin race area below. Make sure and get behind and within all crevices. You may be able to actually remove the hook from your machine (if you have an oscillating hook) - if so remove it before dusting in this area. Make sure and use a flicking motion that brings the lint out, not pushing it into the machine!
Make sure to brush within the hook area if it is not removable. Brush out your bobbin case and check the bobbin for fuzz, too. If you can, remove the stitch plate and brush under that, too.
Also brush your uptake lever area and the tension discs (the two areas your thread goes through). Clean off the top of the machine and the stitch plate area, too. Don’t forget to brush off whatever presser feet you’ve been using.
Compressed air can be used for this job, if you’re very careful. HOWEVER, if your machine has circuit boards (many machines made since 1980 do, even if you don’t have fancy stitches) there is a danger of blowing air and dust into the circuit board and damaging it. If you use air, try and blow the lint OUT – slant the tube so the lint will go out. Most of the time I avoid this danger by just using a brush.
How often should you clean your machine?
Well, if you notice lint on your presser foot, you should stop and clean off the inside, too. Some fabrics and threads are “lintier” than others. In any case, I like to clean after every project, or at least for every 4 hours of sewing (this can also equate to 2 used bobbins).
A clean sewing machine is a happy machine. It will help you avoid timing problems and repairs and give you a smoother, neater stitch.
How often do you clean your machine?


I try to remember to clean my machine after every project. If I forget, my machine reminds me by jamming the bobbin or skipping stitches.
ReplyDelete