
Upcycle Your Jeans into a Modern Bag!
We’ve all been recycling jeans into shoulder bags since I
was a girl. When I started designing
bags, I challenged myself to use jeans to make classy, creative bags that are a
cut above what I made in the 70s!
Any upcycling project will require “working with what you
have”. Read all instructions first, then
adapt my steps to your jeans and fabric.
By repeatedly laying out and trial-fitting your pattern, you will insure
having a creative, good-looking purse!

My patterns have rectangular pieces, which makes it easy to
use recycled denim. There are just a few
points to remember:
- Combine your recycled jeans with another fabric; I like cotton prints – batiks are especially nice.
- Cut the strap (or straps) out of one of the legs before you get too far in cutting them up.
- Always interface after piecing – it makes them look crisper and you won’t have to worry about cutting on the grain. Also, many modern jeans are stretchy and the interfacing will stabilize to make a strong purse.
- Feature a special part of your jeans – whether it’s a pocket or embroidery or even a hole!
- Don’t be afraid to piece – it will make your purse even more interesting.
- Press your pieces before cutting to size. If the denim is stretchy, try to press (not iron) without stretching.
- Use your old jeans, your kid’s old pants, buy some from Goodwill, or combine a bunch of scraps. I’ve even removed the pockets and added them to new denim.
Any of my patterns are suitable for upcycling jeans – I’ve
made jeans purses from the Zippy Tote, Joey Purse, Charmer Tote, ReversibleBookbag Tote, and Jamie Bag.
This tutorial uses my Zippy Tote pattern, but you can adapt
it to whatever pattern you’d like. I’m using a (very) old pair of my daughter’s
jeans, a tiny child’s size 12 Slim in a magenta corduroy, so I had to do a
little patching. If you have a larger pair
of jeans you can do less piecing, but I think it’s always interesting to have a
few seams.
Some patterns may need to be simplified – I eliminated the
outside hidden pockets of the Zippy Tote.
I’ll have the original jeans pockets to use as outside pockets!

Materials Needed
- One pair of jeans (the child’s size 12 Slim was enough, carefully cut, but I had VERY little left over)
- 1/3 yard for top bands and pockets
- 1/3 yard for lining

1) Choose fabric that coordinates
with your jeans. I always like to add a
print, it makes it lively!


2) First, examine and measure your
jeans to see how the pattern will fit.
Plan on using your jeans for the main pattern pieces. In this case, I will use these pants for the
front and back of the Zippy Tote, and the straps. In the case of the Joey Purse or Sheila Purse
I may plan on using jeans for the flap, strap, front and back, and the side
pockets.
From the measurements, I can tell
I will probably need to add to the sides and bottom of the main piece of jeans
I use.

Make sure and use the embroidered
part of the pants to the best effect.
You don’t want to just cut up the jeans and then figure out how to use
them!


3) In this case, I cut the legs close
to the crotch first. I know the legs
aren’t very long and I need a 30” length for the straps. If I had an adult pair of jeans, I would
probably cut the legs off about 4-5” below the crotch. But remember, you can always piece to make it
longer!

4) Here’s the first creative “modern”
touch. Instead of cutting on the side
seams (or just sewing up the legs to make a purse), I cut on the crotch
seam. This way the front pockets and
back pockets will show on the front and back of my purse!


The “front” has the pretty embroidery. The “back” doesn't have embroidery, but I will fix that too!


5) Because my front and back aren’t
quite big enough for my pattern pieces, I will use part of my legs to
piece. Slice up one seam of the leg.
Cut the hem off. It’s not necessary to rip most of the seams,
you can just cut them with a scissors.

6) Lay out your pieces for the back to see what you
need to add. This is where you decide
what parts you want to feature. In this
case, I wanted to add a little embroidery, since the back had none. I also want to keep the rivets on the
pockets.


7) To keep as much detail on the top
as possible, use a seam ripper to remove the bottom of the belt loop. Cleanly ripped!

8) Make sure there is enough seam
allowance around your featured parts.
The rivet is very close to the edge and I won’t want to stitch over the
bulky waistband, so I rip the waistband area carefully to leave at least ½”
seam allowance above the rivet.

After ripping part of the waistband
and trimming the rest in a straight line, I have the necessary ½” seam
allowance! The back waist of the jeans
was higher than the front, so I just sliced it off. Remember you will apply interfacing, which
will take care of any stretching or bias.

9) Lay out the pieces again, to make
sure you’ll have large enough sections to sew together. If you print out the paper pattern template
from my pattern, you can lay your pieces on that. I am using the grid on my cutting mat as a
guide.

10) Trim your main section so it is
square. I use a clear ruler and rotary
cutter for this, but you can use the adjoining edges of your pattern piece to
make sure the sides are not slanted.


11) I know I will need to add a piece
of corduroy at the bottom of my main piece to make it wide enough. I will use a section of the legs – I don’t
care that it has a seam – that will add more interest. These were bell-bottoms, so the fabric is not
on-grain. Just ignore that and cut the
biggest rectangle (keep the corners square) possible out of the piece.

You can see that the corduroy grain will not be straight – some lines will be slanted. That will not be noticeable in the finished purse, I promise! Cut the ends of the rectangle so they are square, not slanted.


12) Lay out below the main
section. Cut the rectangle length to fit
the main section. Notice I made sure the seams of the two sections were not in
the same place – eliminate as much bulk as you can.
Pin very carefully – corduroy and
stretchy denim tends to crawl as you sew!!

13) Sew with ¼” seam. All piecing work is fine to use a ¼” seam
allowance, which will eliminate bulk and give you as much use of the pants
fabric as possible. Remember these
pieces will be interfaced, which will add strength.


14) Lay your main section out and cut
the remaining fabric to fit. I have made sure
the embroidered section is square on the joining sides and top, but not the
bottom. It’s safest to piece a little
extra so that you can trim to size after sewing the sections together. See how the bottoms don’t meet?

15) Sew with a ¼” seam. Be careful to avoid any rivets or pockets. If I know I have something bulky close to my seam allowance, I sew with that side up so I can see it, avoid it, and SEW SLOWLY in that area.


Press some seams open to reduce
bulk.

16) The back section is ready to be
trimmed to pattern size! By allowing some extra fabric on 3 sides, I’m able to get my “featured parts” where I want them. Trim to pattern size.

17) Slice the other leg to prepare the
straps before you finish the front piece.


18) Cut the strap pieces. I decided to use the embroidered section for
one of the straps, too.
Because my strap pieces were still not quite long
enough, I cut 3 pieces.

Each strap will have a seam,
adding to the charm, right?

19) To show the embroidered pockets to
best effect on the front, I will add to both sides and the bottom of the main
section. Repeat as with the back pattern
piece.

20) Front section trimmed square to
fit pattern measurement.

21) Always interface! Even if the denim is heavy, you’ll want to
stabilize any seams or off-grain pieces.
It makes the purse stronger and crisper (I like that modern look!). I like Pellon Décor-Bond heavyweight iron-on
interfacing.

Use a pressing cloth between the
interfacing and the iron. Press hard
from the interfacing side. A padded
ironing board is important if using corduroy!


22) Oops! I didn’t do so well ripping the belt loop off
the front section. AFTER interfacing,
this is easily repaired. My daughter’s jeans happened to
have a leather brand-name on the waistband, which came in handy to patch the
hole. I could have also saved one of the
embroidered flowers or butterfly to mend it or used a piece of corduroy and
decorative stitching. Always make your
repairs after piecing and interfacing, if possible – you’ll get a neater
finish.


Make sure any patch or label is
not within the seam allowance (1/2” in this case).
No one will ever know this was a
mistake!

23) Construct purse as pattern
instructs. When stitching purse pieces together, you may need to use a zipper
foot to avoid rivets and other features.
This ensures your seam is straight and strong.

Barely missed the label, but it
looks like I planned it!!

My Zippy Pink Cord Tote turned out nicely.

This Reversible Bookbag Tote was made with scraps from several different jeans.

Because the Jamie Bag has pleats, I kept the heavier weight denim in the center and put batik where the pleats go!
What pattern will you use to upcycle your jeans?
I LOVE this tutorial! I have bought several of the patterns and will have to try this with some of the old jeans that I've kept laying around! And how easy would it be to embroidery something fancy (like it actually belonged on the jeans!) to include?
ReplyDeleteI pinned you...hope you're not an anti-pinner---perhaps some of my 'followers' (?) will find your patterns and love them like I do!
Thanks, Christina! That's a great idea for the embroidery - would also be a way to repair any holes or thin spots. And I love to be pinned, too.
DeleteWOW WOW WOW~~ That's such a detailed tutorial. And I'm LOVING the corduroy purse. You're kind of an evil genius you know. :)
ReplyDeleteGreat ideas, the bags look great.
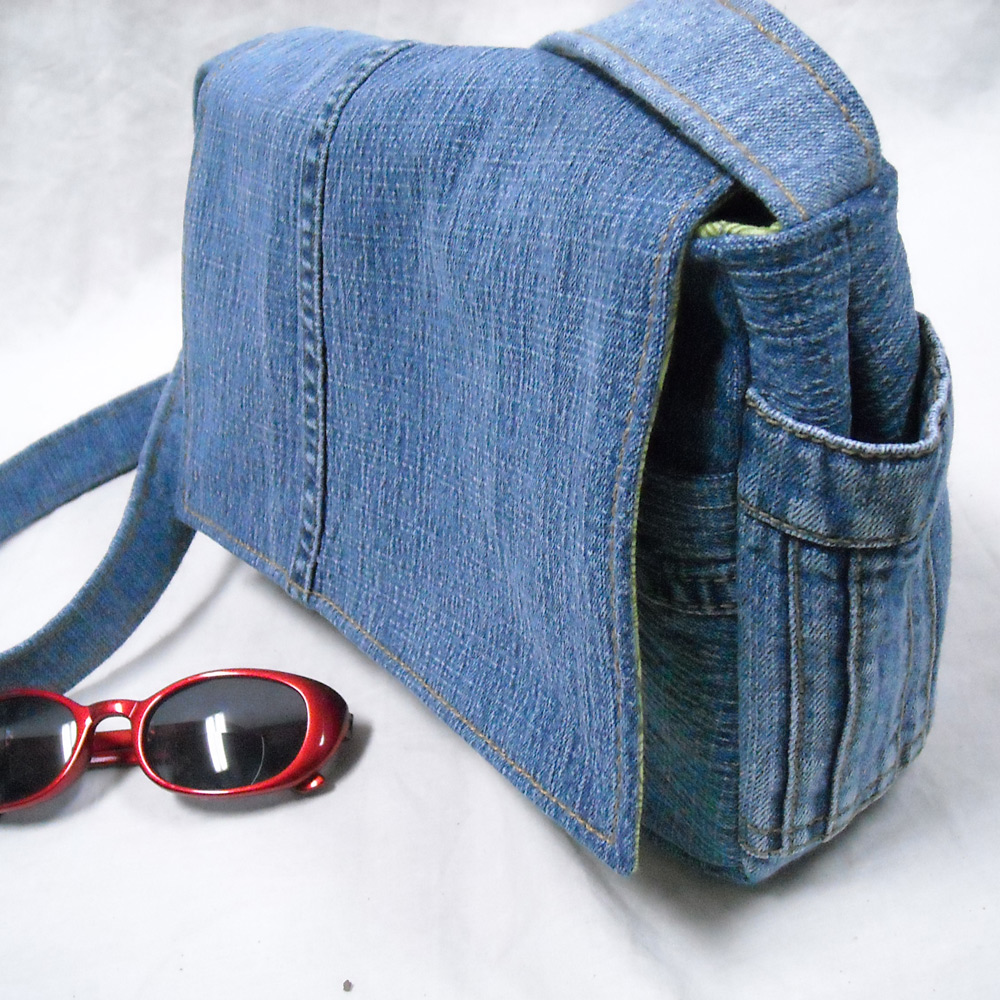
ReplyDeleteIs it possible to get the pattern or a tutorial for the Sheila bag? Is that the bag pictured with the flap? So creative!
ReplyDeleteThe one pictured is the Joey Purse! The Sheila is a bigger version of the Joey - https://www.etsy.com/listing/93517395/cross-body-purse-pdf-sewing-pattern?ref=shop_home_active
DeleteThanks and happy stitching!!
Thanks so much!
DeleteIs it possible to make the larger bag with the Joey pattern? :)
DeleteHere's a post which tells you how easy it is to adjust the size on my patterns:
Deletehttp://sidquilts.blogspot.com/2012/06/i-wish-that-purse-was-just-little.html
When you make the zippy tote with jeans do you need a zipper? If so what size? Can you tell the measurements of everything in an a adult size 10 - 12 jeans?
ReplyDeleteAll the details including zipper length & size pieces to cut are included in my pdf pattern:
Deletehttps://www.etsy.com/listing/61218587/zipper-hobo-pdf-purse-pattern-easy
Email me back at anndrea.noel@gmail.com please.
ReplyDelete